Cyclic Stick
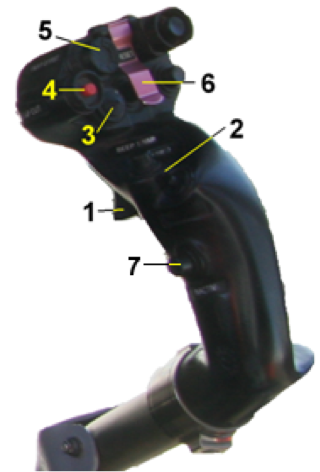
The Cyclic Stick controls the movement of the helicopter around the pitch and roll axes. Normally you use a joystick for this purpose. The following figure shows a typical real EC 135 Stick with its buttons. Red marked functions are absolutely needed, green are useful when you fly with autopilot. To learn more about assignment of custom functions to a joystick button refer to Setting up Your System.

- ICS RADIO (ATC and intercom)
- FTR Force Trim Release button
- BEEP TRIM (4way hat switch)
- SAS/AP CUT (turns off SAS and autopilot)
- P/R // YAW // PITCH DAMPER RST (resets and reactives SAS and pitch damper)
- CDS/AUDIO RESET (acknowleges cautions and warning sounds)
- APMD DCPL (aborts autopilot's upper modes)
To reduce pilot's workload this rotorcraft is equipped with a comfortable Trim system. It consists of a 4 way BEEP TRIM switch and a FORCE TRIM RELEASE FTR) button. In real live this is implemented with springs and actors that neutralize pilot's effort in the center of the trimmed position. This is not possible with normal joysticks. Therefore we go another way to realize the trim functions. FORCE TRIM RELEASE in EC 135 V5 works as follows:
With software version 5.26, the functionality of the FTR button for use without autopilot has been fundamentally changed. The behavior is now similar to that when operating with AFCS. This is intended to avoid misunderstandings.
For fine tuning the trim position use the BEEP TRIM 4 way switch.
With Rotor RPM below 80 % pressing FTR button will reset all trimming to zero. So you can get a neutral trim position while standing in IDLE state on the ground.
Trim functions have other meanings when flying with autopilot. For details refer to AFCS's description.
Force Trim function can be configured to be used with a non-cantering joystick or the MOZA AB 9 Flight Base . This is possible via the EC 135 V5 > General operation menu or in the preferences file.
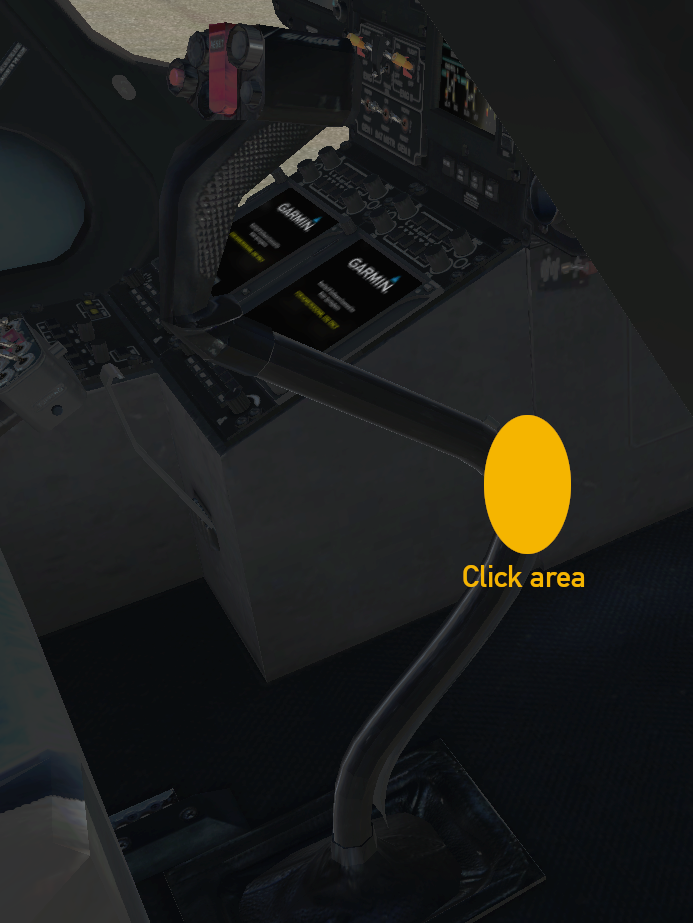
Cyclic stick can be locked mechanically or unlocked by clicking on the respective clamp. With locked stick inputs to pitch and roll by joystick are inhibited.
Collective Pitch
The Collective Pitch controls the power of the aircraft. When using the throttle lever or a normal joystick it will mostly be necessary to reverse the axis in X-Plane's joystick settings. Standard throttle levers give more power when pressed forward. Helicopter's collective give more power when pulled up.
On the collective pitch pilot can switch on and off
- Search and Landing Light (if installed)
- Standard Landing Light
Yaw Control
To compensate the turning moment of the helicopter you need a yaw control. In the simplest case this can be the twist grip of a joystick. Because it is necessary to control yaw while the complete flight and the helicopter will react very strong to these inputs, we recommend to use rudder pedals for flying helicopters. Best are pedals without as center springs.
Stability Augmentation System (SAS)
YAW SAS and P&R SAS provide artificial stability in yaw axis respectively pitch and roll axis. Additional there ist pitch damper. All these systems are activated automatically by power-up. Pressing SAS/AP CUT deactivates the SAS. Y RST reactivates YAW SAS, P&R RST reactivates P&R SAS, PITCH DAMP RST reactivates the pitch damper. On panel the button P&R RST combines the reactivation of P&R SAS and PITCH DAMP RST in one button.
Double Control
A second controller can be connected for a co-pilot or student pilot. With the double control function, the controls can be passed between main controller and additional controler without interruption.
The additional control is connected to the PC as an additional joystick and configured as follows:
- Pitch axis → REVERSE1
- Roll Axis → REVERSE2
- Yaw axis → REVERSE3
- Collective → REVERSE4
In order to initiate the handover, the command "Switch Pilot/Copilot Control Status" (here SWITCH) is required, which is sensibly configured to a button on the pilot control.
The transfer is started by pressing SWITCH. Gauges appear in the co-pilot's and pilot's NDs, showing the position of the controls. The taker lines up his controls with those of the giver. With that, control is passed. When all axes have been accepted, the gauges disappear automatically. As long as the co-pilot has sole control, the advisory CO IN CMD is displayed at CAD.
Control can be returned by pressing SWITCH again.
Gauge Color Codes: Green is in control. Yellow is ready to take control. Red has no control. Own control position is cyan, each other's control is white.
 Deutsch (Deutschland)


