 Deutsch (Deutschland)

System Requirements
EC 135 V5 and EC 135 Pro are add-ons for X-Plane. EC 135 V5 is available for X-Plane 12 and in a legacy version for X-Plane 11, EC 135 V5 Pro is available for X-Plane 11 only.
To use the add-on, you need
- X-Plane 12.3.0 oder newer. Only approved for release versions of X-Plane, not for betas.
For the legacy version for X-Plane 11 you need X-Plane 11.55. - a computer system that is able to run X-Plane in a performant matter,
- at least a high resolution joystick with throttle controller (used as collective) and rudder controller,
- Supported operating systems: Windows 11, macOS 12 (Monterey) or later, Linux (plugin built and tested at Ubuntu 22.04.3 LTS).
We strongly recommend pedals for rudder control and a joystick with a strong centering spring. For the most realistic flight experience, we recommend a force feedback joystick with the MOZA AB 9 and a stick extension of approximately 20 cm.
The helicopter in the freeware or version is optimized for flights in VR.
Notice Controlling the helicopter via keyboard is not possible and not intended. The version is intended for use in a home cockpit; additional hardware devices are required for this.
This addon for X-Plane is not approved for any beta version of X-Plane. NOT APPROVED! Never!
Installation in X-Plane
The add-on is basically installed like any other aircraft in X-Plane.
-
Download the package you want.
Freeware and Plus version are same download. The Plus features are activated by entering a license key.
-
Extract the download into a freely chosen subfolder in the X-Plane aircraft directory.
The download is delivered as a 7zip package. To unpack, a corresponding tool is required.
Please pay attention to the folder structure. Behind the Aircraft folder, X-Plane expects exactly one subfolder and then the folder with the helicopter. Occasionally duplicate structures arise when unpacking.
-
Start X-Plane and load the helicopter.
-
If you want to use a Plus or Pro version, enter the license key.
Call up the menu item . In the window that appears, type in the license key using the keyboard of the PC and confirm. On Windows systems, the license key can also be copied via the clipboard. A successfully entered key is saved and does not need to be entered again. After entering the license key, it is necessary to restart X-Plane so that all unlocked functions are available. Note: There is no cursor in the input window. Please just type in the key.
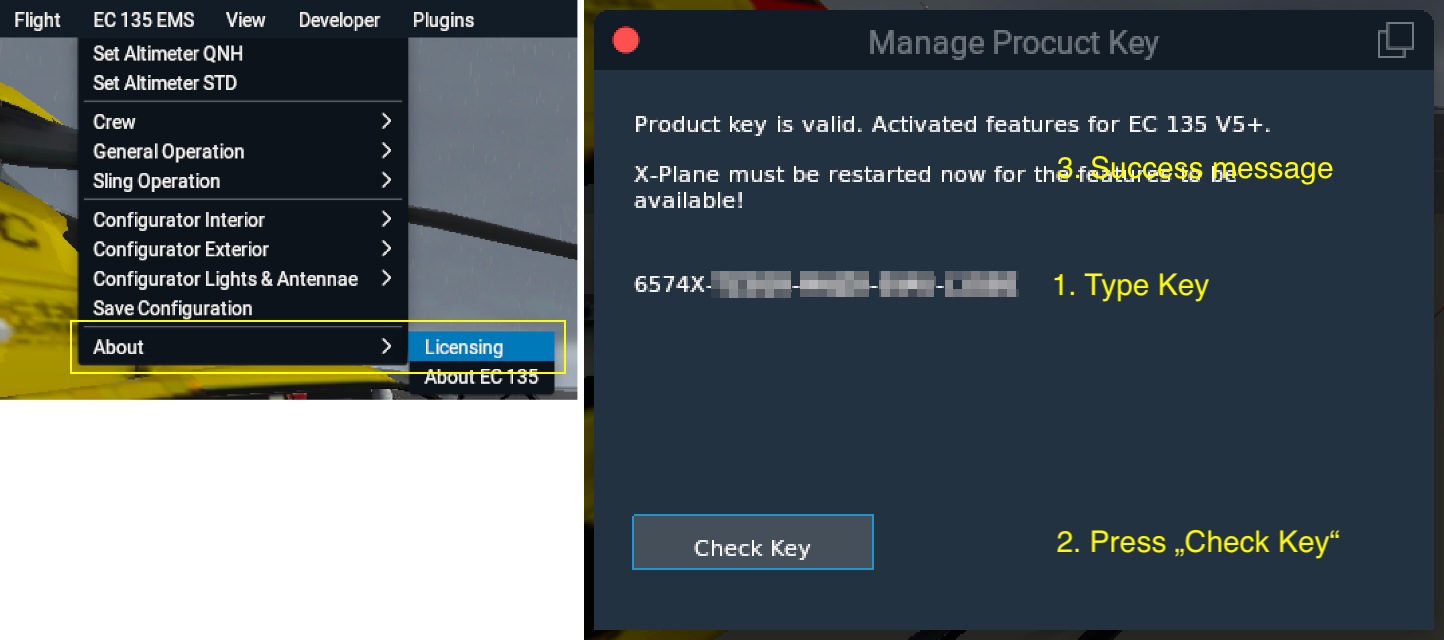
Menu entry and "Manage License Key" window.
Note for Mac users After every new installation or update, the MacOS security system blocks the plug-in. An error message appears. Click on "Cancel" and then go to the security settings. There you will find a message that mac.xpl has been blocked. Click on the "Allow anyway" button next to it. Now you can close X-Plane and restart it. Another error message appears, but you have the option of explicitly opening the plug-in. This is standard MacOS security procedure for executables downloaded from the Internet and is not a bug in our product!
Setting up your controls
It is imperative that the helicopter is loaded to successfully complete the following steps!
Assure your controls (joystick, pedals etc.) are calibrated. Assign the axes of your controls using the example of a Saitek X52 in the following figures.

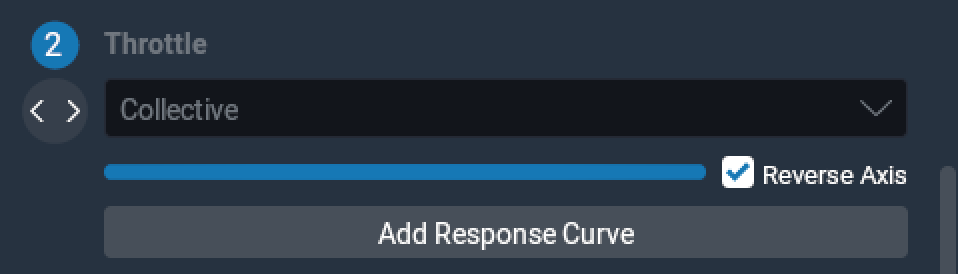
We strongly recommend setting the response curves for all axes to linear,
To use the manual engine control, the TWIST GRIPS for controlling the throttles must be the axes TROTTLE1 and THROTTLE2. A calibration via the menu item is then required.
EC 135 V5 plugin will manipulate the general sensitivity and artificial stability settings of your joystick. When going back to another aircraft your own preferences will be restored. Please do NOT change the settings made by the plugin in order to obtain a realistic controls response!
Mapping useful buttons
For a good flight experience it is very useful to have important functions on the buttons of the joystick. Some of them are X-Plane's own commands, others are custom commands generated by the EC 135 V5 plugin. Assignment takes place also in X-Plane's joystick settings page. Absolutely minimum required to control the EC 135 V5 are the following commands:
- BEEP TRIM functions realized by X-Plane's trim commands
- FORCE TRIM RELEASE FTR button
- CDS/AUDIO RESET Button


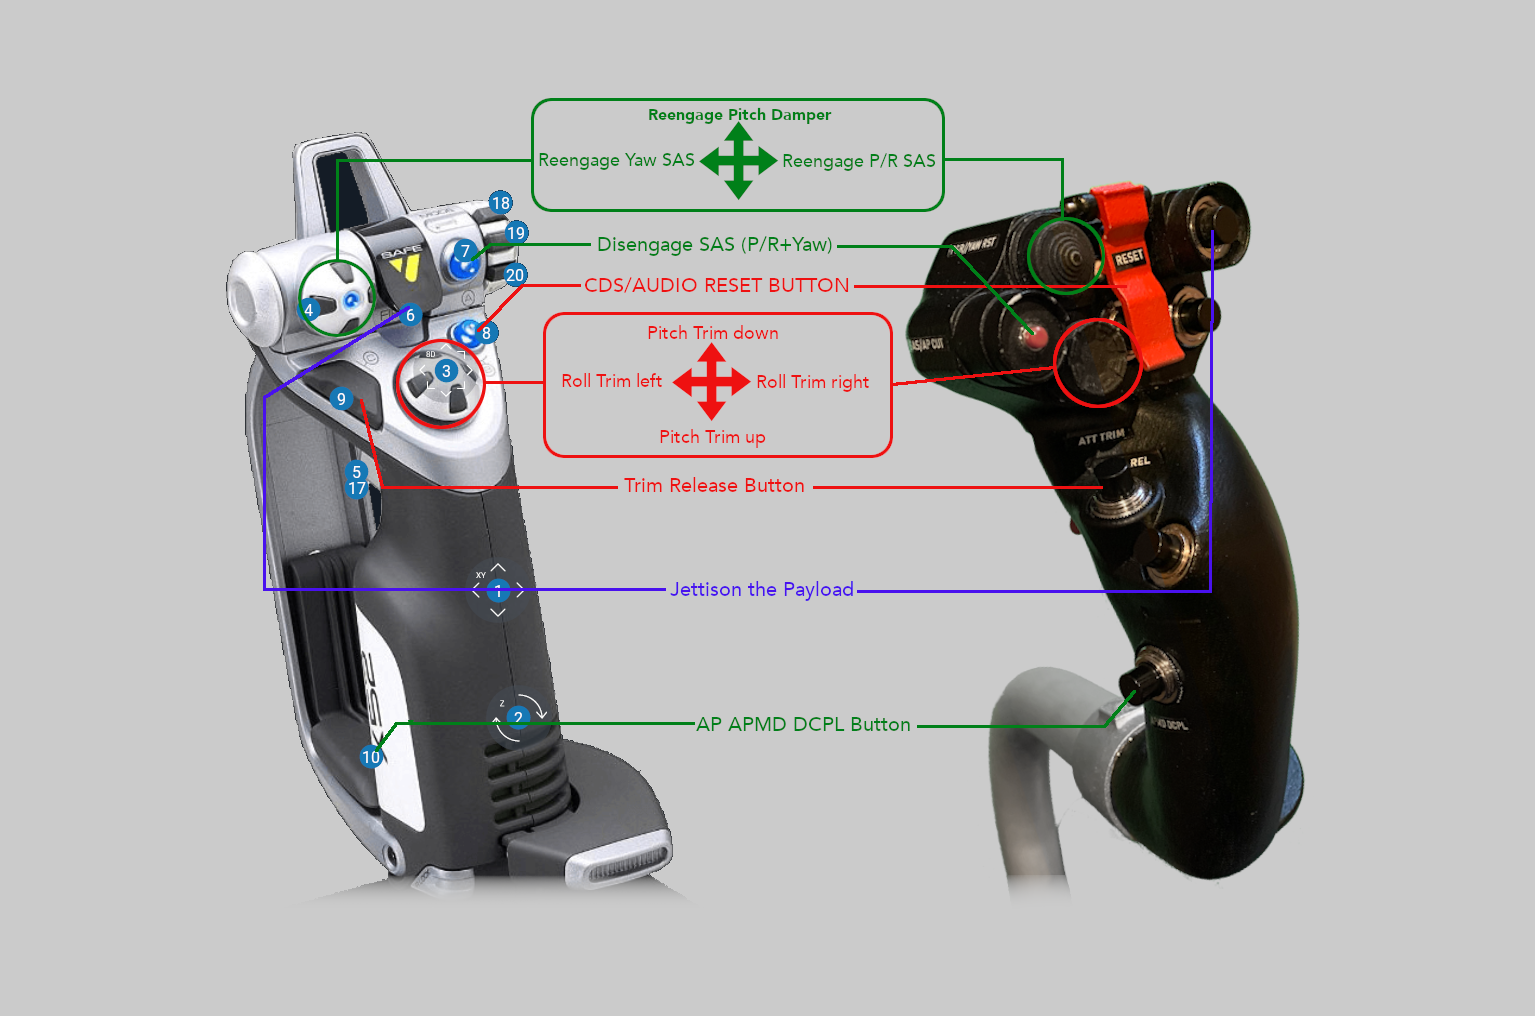
Refer to Controls explanation to learn more about the typical cyclic stick buttons in order to improve your flight feeling.
Don't miss our video tutorial with a step by step explanation for setting up the controls.
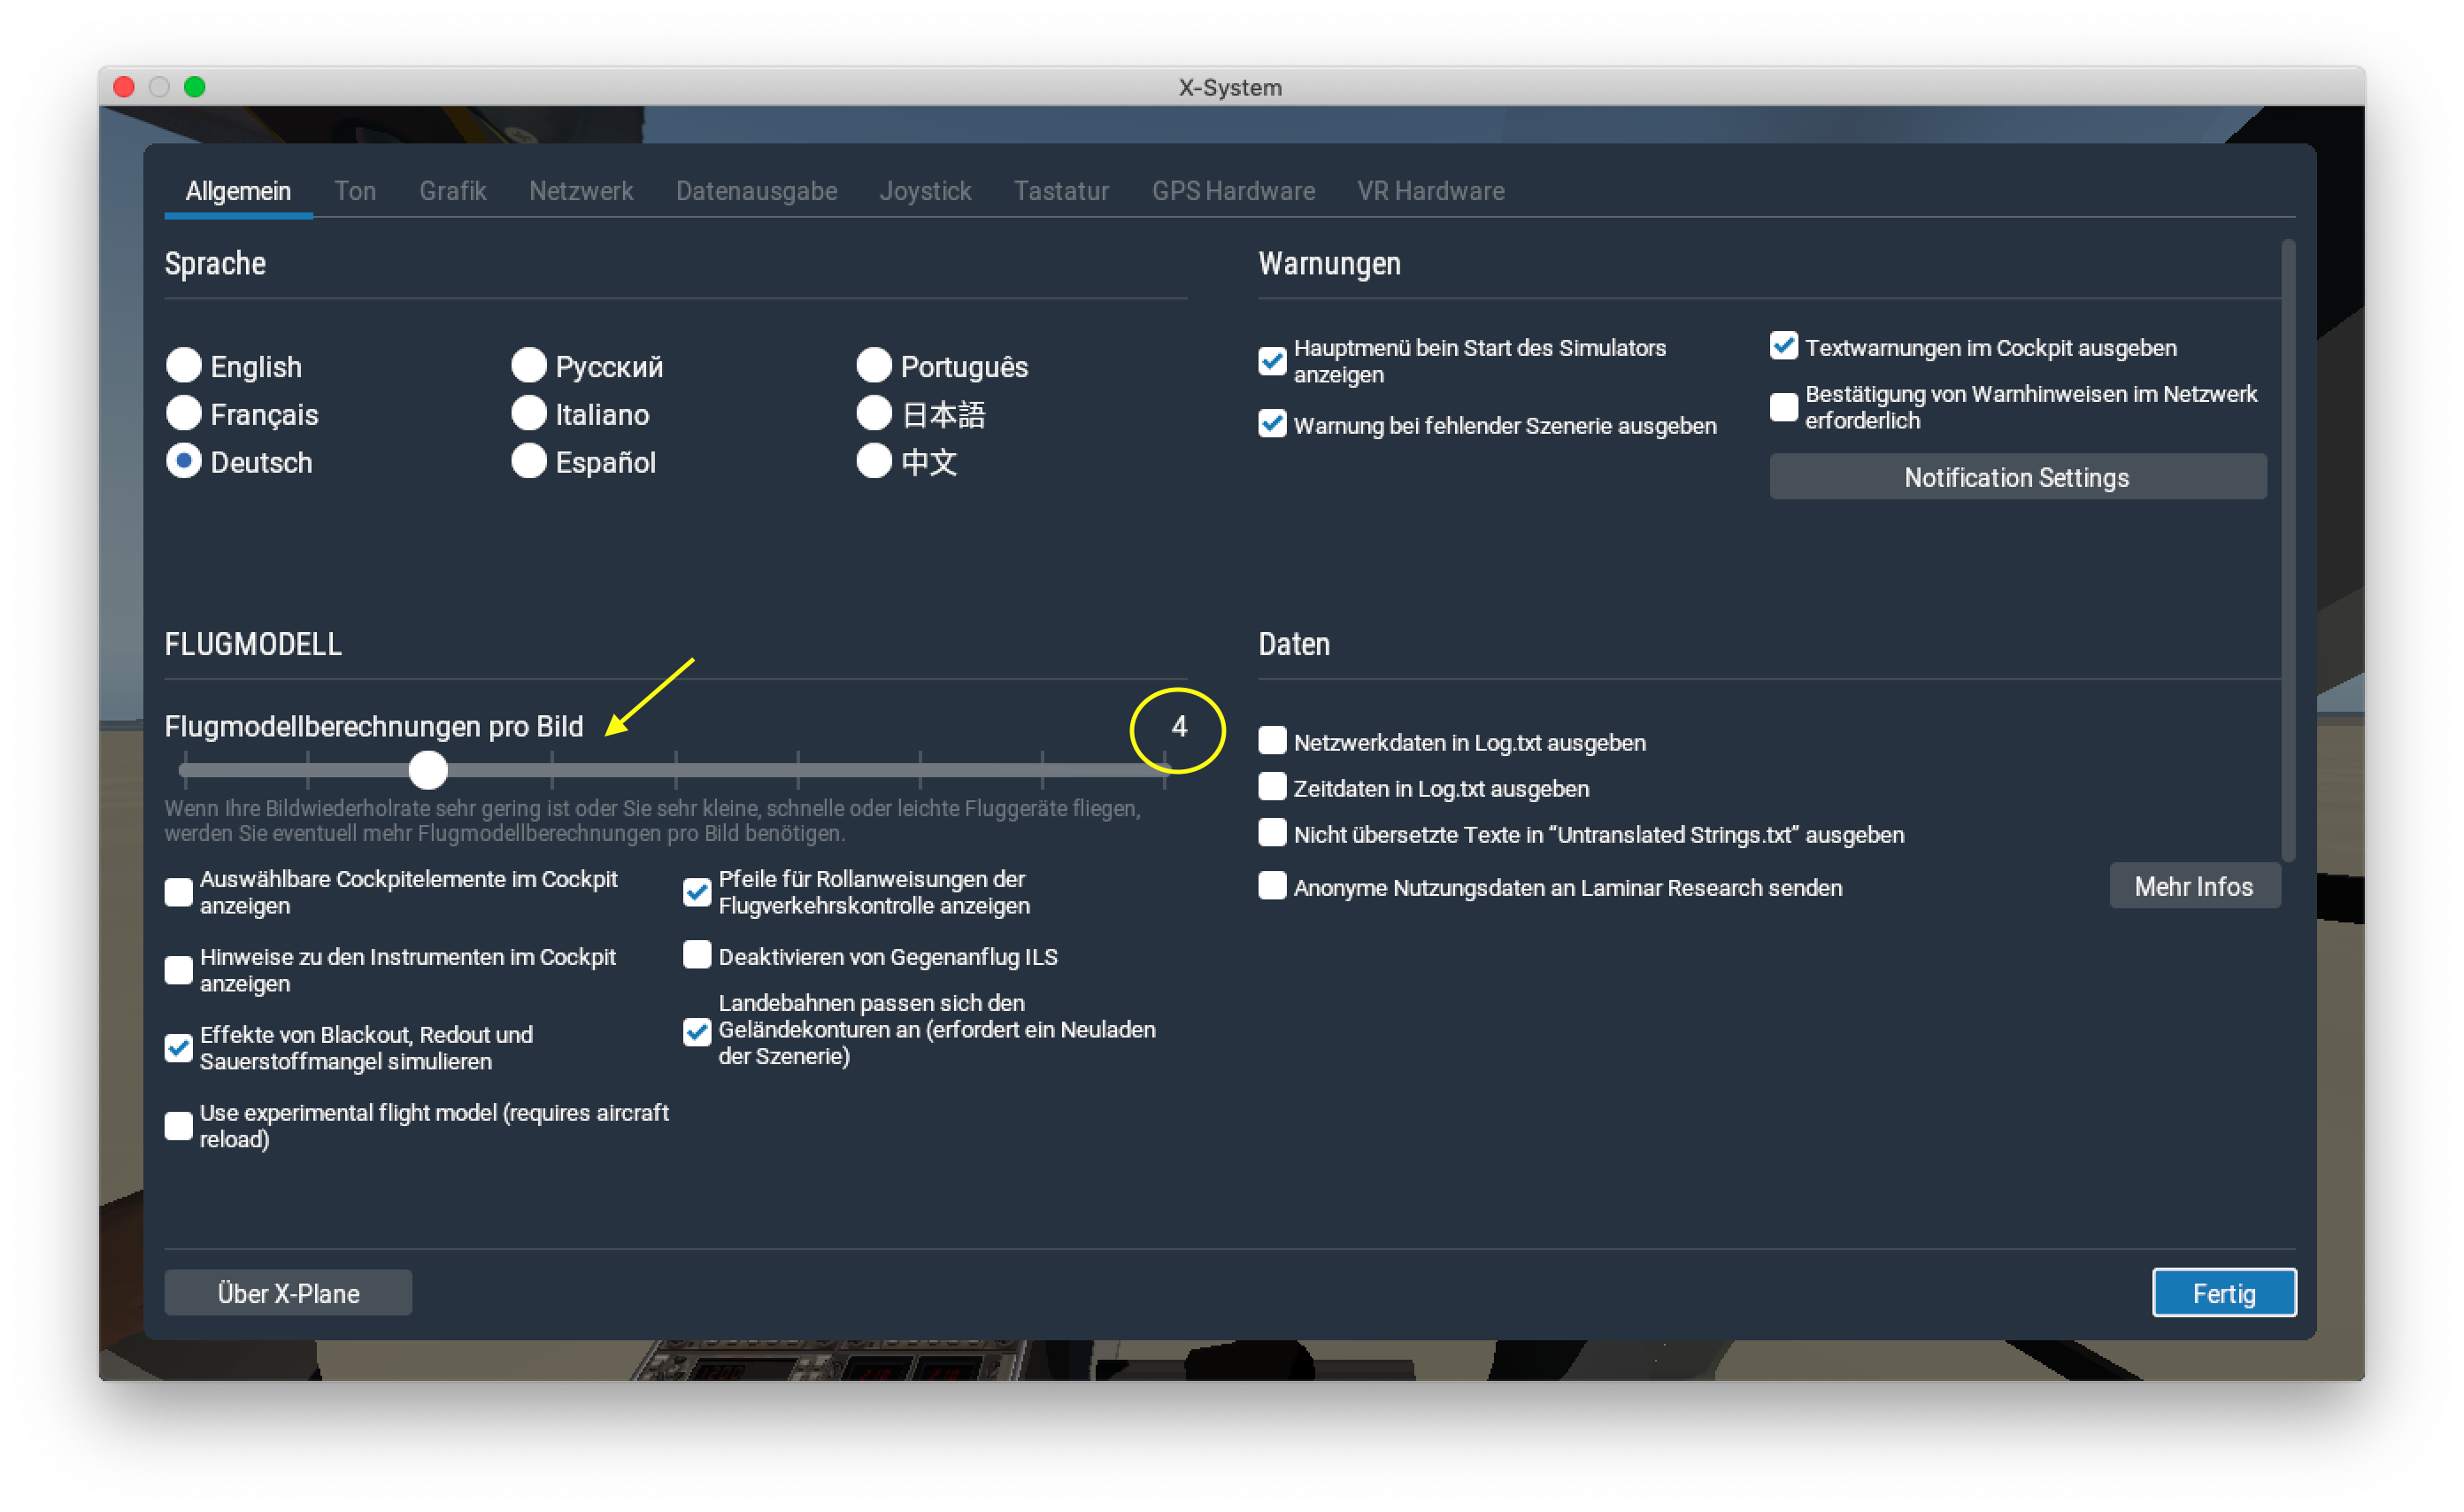
Adjusting flight model calculations
As with all helicopters that are modeled with really (!) hard skids, in X-Plane there is usually a resonance on the ground that causes the helicopter to shake or even slide across the ground. This effect can be eliminated by setting the number of flight model calculations in the X-Plane settings to a high or very high value. In X-Plane 12 values up to 8 or 9 are necessary.
Using a non centering joystick
We recommend a high-precision joystick with a strong centering spring for a quite realistic flight experience or a MOZA AB 9 Flight Base for most realistic flight experience.
However, the EC 135 V5 in and version can also be used with a non-centering joystick.
To do this, you need to change the default setting from to in the menu. This setting can be changed at any time, even during flight. The current setting is automatically saved when the helicopter is unloaded and remains unchanged the next time it is loaded.
Notice Using the autopilot with a non-centering joystick is subject to limitations.
Using a MOZA AB 9 Fligt Base
The MOZA AB 9 force feedback joystick allows for a flight experience on the stick that almost fully corresponds to real-world behavior.
To do this, you need to change the default setting from to in the . This setting can be changed at any time, even during flight. The current setting is automatically saved when the helicopter is unloaded and remains unchanged the next time it is loaded.
Load in Moza Cockpit software the preset for the EC 135. The file named moza_ab9_ec135.preset is located in the root folder of the helicopter. Make sure the preset is loaded every time you fly the EC 135. Unfortunately, Moza currently does not support automatically loading the preset along with the helicopter.
Installing Updates
Updates for the helicopter are provided regularly. These can be installed in different ways.
SkunkCrafts Updater
The preferred method is to use the SkunkCrafts Updater. SkunkCrafts Updater is the de facto standard for convenient incremental updates of X-Plane add-ons.
All packages downloaded since April 15, 2026, are already prepared for the SkunkCrafts Updater. Updates are recognized there, just like for other supported products, and can be downloaded incrementally. Another advantage of this method is that any custom liveries you have installed will not be deleted.
For installations that are not yet prepared for the SkunkCrafts Updater, there is a file in the download area that allows you to easily retrofit it.
Reinstalling the Package
Alternatively to incremental updates, you can, of course, download and reinstall a complete, up-to-date package. If the package is installed alongside an existing installation in a separate folder, any existing license key must be re-entered in the new installation. This step is not necessary if the package is installed in the same folder.